Unlock the Secret to Deep Flavor: DIY Preserved Lemons
Imagine a culinary ingredient that transforms ordinary dishes into masterpieces of rich, savory complexity. An ingredient that offers the bright, zesty essence of lemon but with an added layer of mellowed, almost fermented depth that elevates it far beyond its fresh counterpart. This is the magic of preserved lemons. While they might conjure images of exotic North African souks, mastering how to make preserved lemons at home is surprisingly simple, yielding a pantry staple that promises to revolutionize your cooking.
For many, the first encounter with preserved lemons is an awakening. Think of the intensely flavorful chicken tagine, a dish that carries a unique, indescribable zest. That unforgettable complexity, as described by Boston chef Ana Sortun, is often attributed to "lemon umami" – a fermented quality that only preserved lemons can provide. This ancient technique, dating back to a 12th-century Egyptian treatise, transcends simple preservation, turning a humble citrus fruit into a profound flavor enhancer.
The Culinary Alchemy of Preserved Lemons: Beyond Zest
What precisely makes a preserved lemon so different from a fresh one? It's all in the transformation. When lemons are cured in salt, a fascinating process of lactic acid fermentation begins. This natural alchemy breaks down the bitter compounds in the rind, mellows the sharp acidity of the fruit, and develops a profoundly savory, umami-rich flavor profile. The result is a soft, pliable rind with an intense, concentrated lemon essence that's less tart and more aromatic than fresh lemon zest or juice.
This unique flavor contribution is why preserved lemons have been a cornerstone of Middle Eastern and North African cuisines for centuries. From Moroccan tagines and Tunisian chickpea stews to Indian curries and Israeli salads, their distinctive character is irreplaceable. While initially a means of preserving fruit beyond its season, it quickly became evident that the curing process created something entirely new and exceptional. To learn more about their fascinating journey through history, explore
The Ancient Art of Preserved Lemons: History & Flavor Secrets.
Why Make Your Own? The Advantages of DIY Preserved Lemons
While specialty stores might carry preserved lemons, making them yourself offers numerous advantages that elevate the experience and the final product:
- Control Over Ingredients: When you make your own, you choose the lemons. Opting for organic, unwaxed lemons ensures you're preserving pure flavor without any unwanted chemicals. You also control the type of salt used, often favoring non-iodized options for better fermentation.
- Cost-Effectiveness: A few fresh lemons and some salt are remarkably inexpensive compared to buying pre-made jars, especially when considering the long shelf life of the homemade version.
- Unbeatable Freshness & Potency: Homemade preserved lemons, made with high-quality, fresh fruit, often possess a more vibrant and potent flavor than mass-produced alternatives.
- Personal Satisfaction: There's immense joy in crafting your own pantry staples, transforming simple ingredients into something extraordinary. It demystifies an ingredient that once held an "aura of exoticism," making it accessible to every home cook.
Making preserved lemons is less a recipe and more a patient process of salt and time. The effort is minimal, and the reward is immense. Here's a comprehensive guide on
how to make preserved lemons that will infuse your dishes with unparalleled depth.
Equipment and Ingredients You'll Need:
- 6-8 medium to large organic, unwaxed lemons (enough to tightly fill your jar)
- Approximately 1/2 cup coarse sea salt or kosher salt (non-iodized is preferred as iodine can interfere with fermentation)
- 2-3 additional fresh lemons for juice (if needed)
- Optional: 1-2 bay leaves, a few black peppercorns, a cinnamon stick, or a tablespoon of coriander seeds for added aroma.
- 1-2 clean, sterilised 500g (1lb 2oz) Kilner-type jars with airtight lids
Step-by-Step Instructions:
- Sterilize Your Jars: This crucial step prevents spoilage.
- Oven Method: Preheat your oven to 140°C (275°F/Gas Mark 1). Wash the jars and lids thoroughly in hot, soapy water, then rinse well. Place them upside down on a baking tray in the oven for at least 15-20 minutes, or until completely dry. Allow them to cool before handling.
- Dishwasher Method: Run your jars and lids through a hot cycle in your dishwasher. Ensure they are completely dry before use.
- Prepare the Lemons:
- Thoroughly scrub all the lemons clean under warm water, removing any dirt or debris.
- Trim a small amount off both ends of each lemon.
- For the traditional quartered method: Cut each lemon almost all the way through into quarters, leaving them attached at the base. This allows you to pack them tightly and infuse the salt effectively.
- Alternatively (as suggested in some recipes): Cut each lemon in half lengthways, then cut each half into three long, thin slices. This method can sometimes be easier for packing into narrower jars. For this guide, we'll focus on the quartered method.
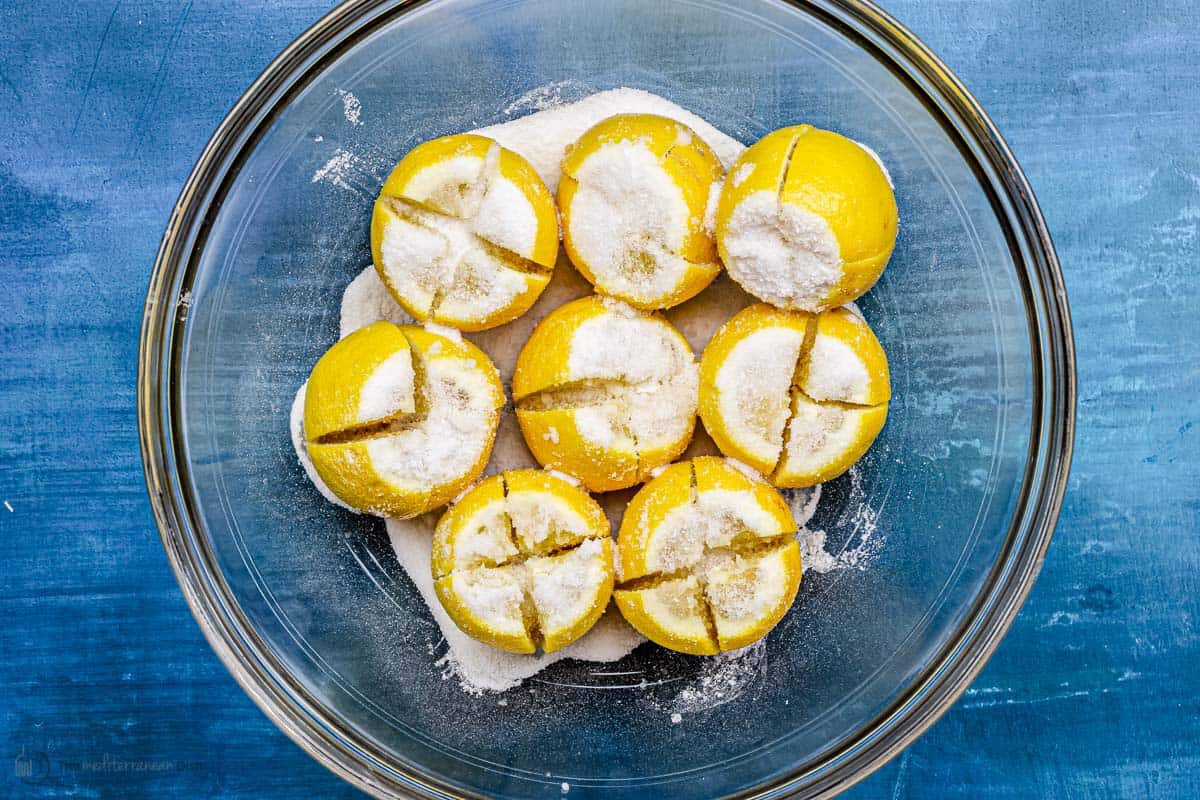
- Salt and Pack:
- Liberally stuff each quartered lemon with coarse salt, pushing it into the cuts.
- Place a layer of salt at the bottom of your sterilised jar.
- Begin tightly packing the salt-filled lemons into the jar. Use a wooden spoon or your fist to press down firmly, extracting as much juice as possible. The goal is to pack them so tightly that the lemons begin to release their own juice and become submerged.
- Add more salt between layers of lemons as you go, along with any optional spices if using.
- Continue pressing and packing until the jar is completely full and the lemons are mostly submerged in their own brine.
- Top Off and Seal:
- If the lemons are not fully submerged in their own juice after packing, squeeze additional fresh lemon juice from your extra lemons over the top until they are completely covered. This is essential to prevent mold growth.
- Ensure there's at least a 1/2-inch headspace from the rim of the jar.
- Seal the jar tightly with its lid.
- Fermentation and Patience:
- Store the sealed jar in a cool, dark place (like a pantry or cupboard) for at least 3-4 weeks.
- For the first week, turn the jar upside down and right side up daily, or gently shake it, to distribute the salt and juices.
- After the first week, a gentle shake every few days is sufficient.
- You'll notice the rinds softening and changing color over time.
- Storage and Shelf Life:
- Once opened, store preserved lemons in the refrigerator. They will last for at least 6 months, and often up to a year or even longer, continuing to develop flavor.
- A thin, white film (kahm yeast) might form on the surface; this is usually harmless and can be skimmed off. However, if you see fuzzy, colored mold, discard the contents.
Elevating Your Cuisine: Creative Ways to Use Preserved Lemons
Once your preserved lemons are ready, a world of culinary possibilities opens up. To use them, simply remove a piece, rinse off any excess salt under cold water, and often discard the pulp, using only the soft, aromatic rind. Finely chop or mince the rind, and then get creative!
- Classic Tagines & Stews: The quintessential use. A tablespoon of finely chopped preserved lemon rind in a chicken, lamb, or vegetable tagine adds unparalleled authentic flavor.
- Dressings & Marinades: Mince the rind and incorporate it into vinaigrettes for salads, or use it in marinades for chicken, fish, or tofu.
- Roasted Vegetables: Toss chopped preserved lemon with root vegetables (potatoes, carrots, parsnips) or green beans before roasting for a bright, savory kick.
- Seafood & Poultry: Stir into rice for prawn curry, or stuff into the cavity of a whole roasted chicken with herbs. Add to grilled fish or shrimp scampi.
- Grains & Pasta: Stir into couscous, quinoa, or rice dishes. Fold into pasta with olive oil, garlic, and fresh herbs.
- Dips & Spreads: Blend a small amount into hummus, baba ghanoush, or a creamy yogurt dip.
- Sandwiches & Wraps: Add a sliver to your next sandwich or wrap for a burst of unexpected flavor.
- Gremolata: Substitute fresh lemon zest with finely minced preserved lemon in a classic Gremolata (with garlic and parsley) for an extra layer of umami.
- Mashed Potatoes: Stir a tiny bit through mashed potato to serve with fish for an elegant side.
Conclusion
Making preserved lemons is an act of culinary patience that pays off handsomely. This ancient condiment, once an "exotic" secret, is now within your grasp to create at home. By following these simple steps on how to make preserved lemons, you'll unlock a powerful flavor enhancer that will add rich umami and unparalleled culinary depth to a vast array of dishes. Take the plunge, fill your jars, and prepare to be amazed by the transformative power of this humble citrus. Your palate will thank you.